Building a Low-Light Image Enhancer with GLADNet in PyTorch
Low-light image enhancement is a crucial task in computer vision, enabling better visibility and detail restoration in challenging lighting conditions. In this tutorial, we explore GLaDNet (Global and Local Adjustment Network), a deep learning-based model designed to enhance low-light images effectively. Using PyTorch, we guide you through the step-by-step implementation of GLaDNet, covering dataset preparation, model architecture, training strategies, and performance evaluation. By the end of this tutorial, you will have a fully functional low-light image enhancer built with PyTorch. Whether you’re a researcher, developer, or AI enthusiast, this guide provides practical insights into deep learning-based image enhancement.
Introduction to GLADNet
The key idea behind the GLADNet is to calculate a global illumination estimation for the low-light input, then adjust the illumination under the guidance of the estimation and supplement the details using a concatenation with the original input.

The architecture of the GLADNet comprises two adjacent steps. One is for global illumination estimation and the other is for detail reconstruction.
In the global illumination estimation step, the input images are down-sampled to a fixed size before being processed by an encoder-decoder network. At the bottleneck layer, the network estimates the global illumination of the image. This estimation is then scaled back to the original resolution, providing an illumination prediction for the entire image.
Next, the detail reconstruction step refines the enhanced image. Here, three convolutional layers adjust the illumination based on the global-level prediction while simultaneously restoring details lost during the down-sampling and up-sampling process.
Pytorch Implementation
We will be using LOL dataset.
Downloading the data set from Kaggle and moving it a folder in google drive.
import kagglehub

# Download latest version
path = kagglehub.dataset_download("soumikrakshit/lol-dataset")

print("Path to dataset files:", path)
import shutil
import os
# Source and destination paths
src_dir = "/root/.cache/kagglehub/datasets/soumikrakshit/lol-dataset/versions/1"
dst_dir = "/Computer Vision/Lol_Dataset/Data"
# Create destination directory if it doesn't exist
os.makedirs(dst_dir, exist_ok=True)
# Copy all files and subdirectories recursively
shutil.copytree(src_dir, dst_dir, dirs_exist_ok=True) # For Python 3.8+
print(f"Files copied from {src_dir} to {dst_dir}")Library Installation
!pip install torch torchvision opencv-python numpy matplotlib tqdmImports
import os
import cv2
import numpy as np
import torch
import torch.nn as nn
import torch.nn.functional as F
from torch.utils.data import Dataset, DataLoader
from torchvision import transforms
import torch.optim as optim
from tqdm import tqdm
import matplotlib.pyplot as plt
Dataset Class
This dataset class is used to load, preprocess, and prepare image pairs for training deep learning models that enhance low-light images. It enables efficient data handling with PyTorch’s DataLoader for batch processing, shuffling, and parallel loading.
- Initialization (
__init__)- The dataset is stored in a specified root directory.
- The class supports both training (
train) and testing (test) splits. - It reads image filenames from the low-light directory (
low/) and assumes corresponding normal-light images exist inhigh/.
- Dataset Length (
__len__)- Returns the total number of image pairs available in the dataset.
- Fetching an Image Pair (
__getitem__)- Loads both low-light and normal-light images using OpenCV.
- Converts images from BGR to RGB format.
- Normalizes pixel values to the
[0, 1]range for deep learning compatibility. - Converts images from NumPy arrays to PyTorch tensors (
HWC → CHW). - Applies optional transformations (e.g., augmentations) if specified.
- Returns a paired (low-light, normal-light) image tensor.
class LOLDataset(Dataset):
    def __init__(self, root_dir, split="train", transform=None):
        """
        Args:
            root_dir (str): Path to the LOL Dataset (v1).
            split (str): "train" or "test".
            transform (callable, optional): Optional transforms.
        """
        self.root_dir = root_dir
        self.split = split
        self.transform = transform
        self.low_dir = os.path.join(root_dir, split, "low")
        self.high_dir = os.path.join(root_dir, split, "high")
        self.image_names = os.listdir(self.low_dir)

    def __len__(self):
        return len(self.image_names)

    def __getitem__(self, idx):
        low_img_path = os.path.join(self.low_dir, self.image_names[idx])
        high_img_path = os.path.join(self.high_dir, self.image_names[idx])

        # Read images (BGR to RGB)
        low_img = cv2.cvtColor(cv2.imread(low_img_path), cv2.COLOR_BGR2RGB)
        high_img = cv2.cvtColor(cv2.imread(high_img_path), cv2.COLOR_BGR2RGB)

        # Normalize to [0, 1]
        low_img = low_img.astype(np.float32) / 255.0
        high_img = high_img.astype(np.float32) / 255.0

        # Convert to PyTorch tensors (HWC to CHW)
        low_img = torch.from_numpy(low_img).permute(2, 0, 1)
        high_img = torch.from_numpy(high_img).permute(2, 0, 1)

        if self.transform:
            low_img = self.transform(low_img)
            high_img = self.transform(high_img)

        return low_img, high_img
GLADNet Class
The GLADNet class defines a deep learning model for low-light image enhancement. It follows the Global and Local Adjustment Network (GLaDNet) architecture, which consists of two main processing paths:
- Global Path – Captures large-scale illumination information using an encoder-decoder structure.
- Local Path – Focuses on fine-grained details using shallow convolutional layers.
- Fusion Module – Merges outputs from both paths to produce an enhanced image.
- Global Path (Encoder-Decoder)
- Uses convolution layers (
global_conv1 → global_conv3) for down-sampling, progressively increasing the feature depth. - Uses transposed convolutions (
global_deconv1 → global_deconv3) for up-sampling, restoring the resolution. - Skip connections help retain information lost during encoding.
- Final activation:
sigmoid, ensuring output pixel values remain in[0, 1].
- Uses convolution layers (
- Local Path (Detail Refinement)
- Uses a shallow CNN (
local_conv1 → local_conv3) to enhance finer details lost in the global path. - Skip connections (
l2 + l1) improve feature propagation. - Final activation:
sigmoid, keeping pixel values in[0, 1].
- Uses a shallow CNN (
- Fusion Module
- Concatenates outputs from both paths (
torch.cat([global_out, local_out], dim=1)). - Uses a 1×1 convolution (
fusion_conv) to merge global and local features into a final enhanced image. - Final activation:
sigmoid, ensuring output remains a valid image.
- Concatenates outputs from both paths (
class GLADNet(nn.Module):
    def __init__(self):
        super(GLADNet, self).__init__()
        # Global Path
        self.global_conv1 = nn.Conv2d(3, 64, kernel_size=7, stride=1, padding=3)
        self.global_conv2 = nn.Conv2d(64, 128, kernel_size=3, stride=2, padding=1)
        self.global_conv3 = nn.Conv2d(128, 256, kernel_size=3, stride=2, padding=1)
        self.global_deconv1 = nn.ConvTranspose2d(256, 128, kernel_size=3, stride=2, padding=1, output_padding=1)
        self.global_deconv2 = nn.ConvTranspose2d(128, 64, kernel_size=3, stride=2, padding=1, output_padding=1)
        self.global_deconv3 = nn.Conv2d(64, 3, kernel_size=7, stride=1, padding=3)

        # Local Path
        self.local_conv1 = nn.Conv2d(3, 64, kernel_size=3, stride=1, padding=1)
        self.local_conv2 = nn.Conv2d(64, 64, kernel_size=3, stride=1, padding=1)
        self.local_conv3 = nn.Conv2d(64, 3, kernel_size=3, stride=1, padding=1)

        # Fusion
        self.fusion_conv = nn.Conv2d(6, 3, kernel_size=1, stride=1, padding=0)

    def forward(self, x):
        # Global Path
        g1 = F.relu(self.global_conv1(x))
        g2 = F.relu(self.global_conv2(g1))
        g3 = F.relu(self.global_conv3(g2))
        g4 = F.relu(self.global_deconv1(g3))
        g5 = F.relu(self.global_deconv2(g4 + g2))  # Skip connection
        global_out = torch.sigmoid(self.global_deconv3(g5 + g1))

        # Local Path
        l1 = F.relu(self.local_conv1(x))
        l2 = F.relu(self.local_conv2(l1))
        local_out = torch.sigmoid(self.local_conv3(l2 + l1))  # Skip connection

        # Fusion
        fused = torch.cat([global_out, local_out], dim=1)
        out = torch.sigmoid(self.fusion_conv(fused))
        return out
Function to Train the model
The train_gladnet function is responsible for training the GLaDNet model on the LOL dataset for low-light image enhancement. It includes data loading, model training, checkpoint saving, and optional model resumption.
1. Device Selection
- Automatically selects GPU (
cuda) or CPU based on availability.
2. Data Preparation
- Loads the LOL dataset (
trainsplit) usingLOLDataset. - Uses
DataLoaderfor batch processing and shuffling.
3. Model Initialization
- Instantiates
GLADNetand moves it to the chosen device. - Tries to load a pre-trained model (if
model_pathis provided).
4. Loss Function & Optimizer
- Uses L1 Loss (Mean Absolute Error, MAE), which is well-suited for low-light enhancement tasks.
- Uses the Adam optimizer with a learning rate of
1e-4for stable training.
5. Training Loop
- Iterates through epochs and batches, performing:
- Forward pass: Model predicts enhanced images.
- Loss computation: Compares predictions with ground truth high-light images.
- Backward pass: Computes gradients.
- Optimizer update: Adjusts model weights to minimize loss.
- Loss tracking: Displays progress with
tqdm.
6. Checkpoint Saving
- Saves the model every 10 epochs in a specified path (
gladnet_epoch_{epoch+1}.pth). - Helps resume training or use the model later for inference.
def train_gladnet(root_dir, epochs=50, batch_size=4, lr=1e-4,model_path=None):
    # Device
    device = torch.device("cuda" if torch.cuda.is_available() else "cpu")

    # Dataset & DataLoader
    train_dataset = LOLDataset(root_dir, split="train")
    train_loader = DataLoader(train_dataset, batch_size=batch_size, shuffle=True)

    # Model, Loss, Optimizer
    model = GLADNet().to(device)
    try:
      model.load_state_dict(torch.load(model_path, map_location=device))
      print("Model loaded successfully")
    except Exception as e:
      print(f"Error loading model: {e}")

    criterion = nn.L1Loss()  # MAE loss (performs better for low-light enhancement)
    optimizer = optim.Adam(model.parameters(), lr=lr)

    # Training loop
    for epoch in range(epochs):
        model.train()
        running_loss = 0.0
        progress_bar = tqdm(train_loader, desc=f"Epoch {epoch+1}/{epochs}")

        for low_imgs, high_imgs in progress_bar:
            low_imgs = low_imgs.to(device)
            high_imgs = high_imgs.to(device)

            # Forward pass
            outputs = model(low_imgs)
            loss = criterion(outputs, high_imgs)

            # Backward pass
            optimizer.zero_grad()
            loss.backward()
            optimizer.step()

            running_loss += loss.item()
            progress_bar.set_postfix(loss=running_loss / len(train_loader))

        # Save checkpoint
        if (epoch + 1) % 10 == 0:
            torch.save(model.state_dict(), f"gladnet_epoch_{epoch+1}.pth")

    print("Training complete!")
    return model
Function to Test
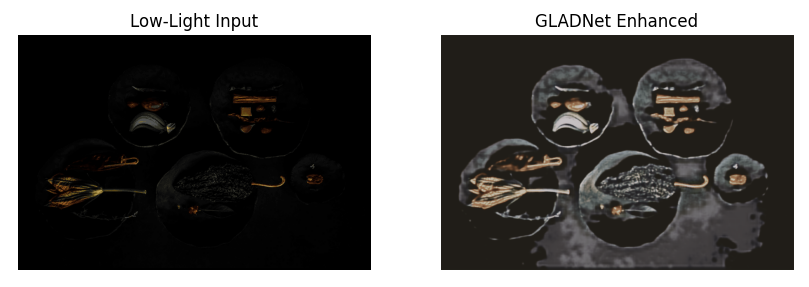
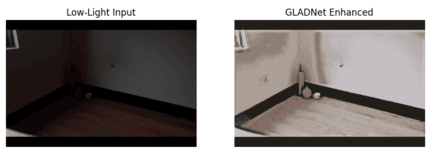
The infer_and_visualize function performs inference using a trained GLaDNet model and visualizes the enhanced low-light image.
1. Device Setup
- If
deviceis not specified, it automatically selects the same device as the model (cudaorcpu).
2. Image Preprocessing
- Reads the low-light image using OpenCV (
cv2.imread). - Converts BGR → RGB (since OpenCV loads images in BGR format).
- Normalizes pixel values to
[0,1]for neural network compatibility. - Converts the image to a PyTorch tensor (
HWC → CHWformat). - Adds batch dimension (
unsqueeze(0)) and moves it to the correct device.
3. Model Inference
- Sets the model to evaluation mode (
model.eval()). - Uses
torch.no_grad()to disable gradient calculations for efficiency. - Passes the low-light image through GLaDNet to obtain the enhanced image tensor.
4. Post-Processing
- Converts the output tensor back to NumPy format (
CHW → HWC). - Scales pixel values back to [0, 255] and ensures valid pixel range using
.clip(0, 255). - Converts to
uint8format for visualization.
5. Visualization with Matplotlib
- Displays side-by-side images of the low-light input and enhanced output using
plt.imshow().
def infer_and_visualize(model, image_path, device=None):
    """
    Args:
        model: Trained GLADNet model.
        image_path: Path to the low-light image.
        device: Optional (e.g., "cuda" or "cpu"). Auto-detects if None.
    """
    # Device setup
    if device is None:
        device = next(model.parameters()).device  # Same as model's device

    # Load and preprocess image
    low_img = cv2.cvtColor(cv2.imread(image_path), cv2.COLOR_BGR2RGB)
    low_img = low_img.astype(np.float32) / 255.0
    low_tensor = torch.from_numpy(low_img).permute(2, 0, 1).unsqueeze(0).to(device)  # Move to device

    # Inference
    model.eval()
    with torch.no_grad():
        enhanced_tensor = model(low_tensor)

    # Move output back to CPU for visualization
    enhanced_img = enhanced_tensor.squeeze(0).permute(1, 2, 0).cpu().numpy()
    enhanced_img = (enhanced_img * 255).clip(0, 255).astype(np.uint8)

    # Plot
    plt.figure(figsize=(10, 5))
    plt.subplot(1, 2, 1)
    plt.title("Low-Light Input")
    plt.imshow(low_img)
    plt.axis("off")

    plt.subplot(1, 2, 2)
    plt.title("GLADNet Enhanced")
    plt.imshow(enhanced_img)
    plt.axis("off")
    plt.show()
Use it
# Path to LOL Dataset (v1)
root_dir = "/Data/lol_dataset"  # Replace with your path
model_path = "gladnet_final.pth"
model = train_gladnet(root_dir, epochs=100, batch_size=4,model_path=model_path)This will take a while.
Testing the trained model
device = torch.device("cuda" if torch.cuda.is_available() else "cpu")
model = GLADNet().to(device)
model.load_state_dict(torch.load(model_path, map_location=device))

# Run inference
infer_and_visualize(model, "/content/2 (1).png")
Output

