Blog App in Django Part I
In this tutorial we will build a Blog application that allows users to create, edit and delete posts. The homepage will list all blog posts and there will be a dedicated detail page for each individual blog post. We will also introduce CSS for styling and learn how Django works with static files.
Table Of Contents
- Start a new Django Project
- Database Models
- Admin
- Views
- URLs
- Templates
- Static Files
- Individual Blog Pages
- Tests
Start a new Django Project
#Terminal
django-admin startproject django_blog_app
cd django_blog_app
python3 manage.py startapp blog
Open django_blog_app/settings.py in your text editor and add the app
# Application definition

INSTALLED_APPS = [
    'django.contrib.admin',
    'django.contrib.auth',
    'django.contrib.contenttypes',
    'django.contrib.sessions',
    'django.contrib.messages',
    'django.contrib.staticfiles',
    "blog.apps.BlogConfig", #new
]
Migrate and Run
python3 manage.py migrate
python3 manage.py runserver
Database Models
Our each post has a title, author and body. We can turn this into a database model by opening and the blog/models.py file and entering the code below:
from django.db import models
from django.urls import reverse


# Create your models here.
class Post(models.Model):
    title = models.CharField(max_length=200)
    author = models.ForeignKey("auth.User",on_delete=models.CASCADE,)
    body = models.TextField()

    def __str__(self):
        return self.title;

    def get_absolute_url(self):
        return reverse("post_detail",kwargs={"pk":self.pk})
At the top, we are importing the class models and the utility function reverse that allows us to reference an object by its URL template name.
We also created a class called Post which is a subclass of models.Model. This provides access to everything within djangodb.models.Models. Then we added additional fields and methods as desired.
Our model has three fields: title which is limited to the length to 200 characters; body which uses a TextField to automatically expand as needed to fit the user’s text and an author ForeignKey that allows for a many-to-one relationship. This means that a given user can be the author of many different blog posts but not the other way around.
A __str__ method is added to provide a human-readable version of the model in the admin or Django shell. And our get_absolute_url method tells Django how to calculate the canonical URL for our model object. It says to use the URL named post_detail and pass in the pk.
To complete our database configuration, we need to run following commands in our terminal.
#terminal
python3 manage.py makemigrations blog
python3 manage.py migrate
Admin
Create a superuser with the following command.
#terminal
python3 manage.py createsuperuser
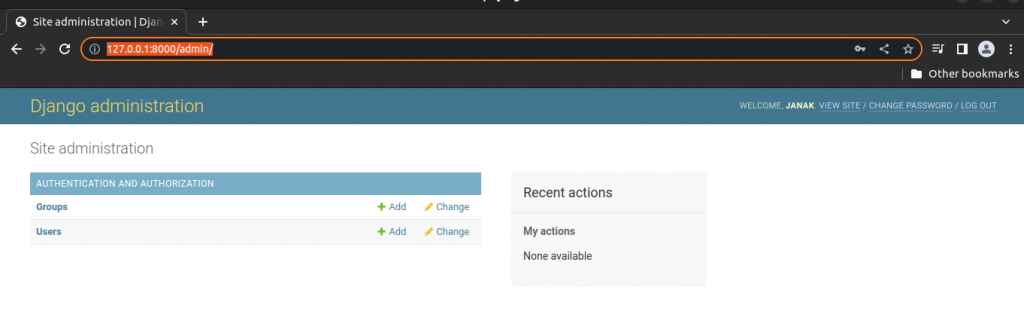
visit http://127.0.0.1:8000/admin/ to login.
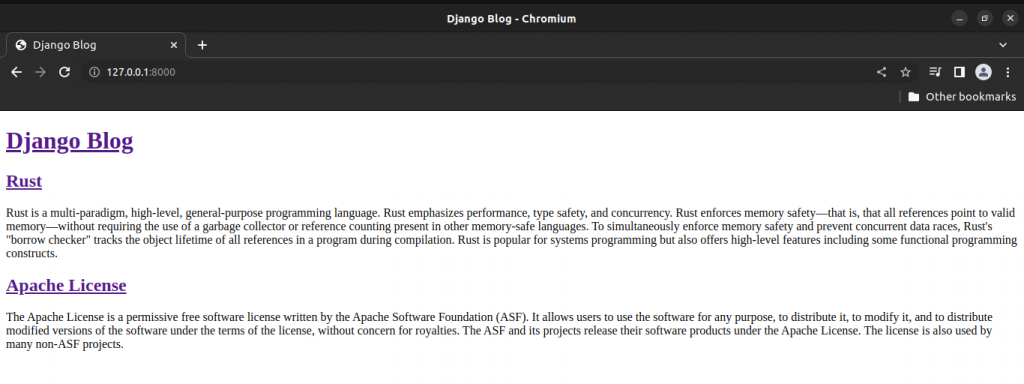
After login you will see something as following image.
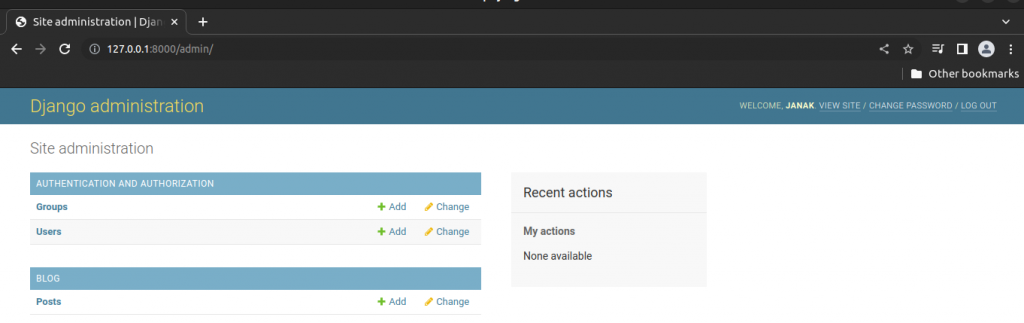
To add our Post model, edit blog/admin.py as follow:
from django.contrib import admin
from .models import Post  #new


# Register your models here.
admin.site.register(Post) #new
Now we can see Post model in our Django Admin Dashboard.
Click on the + Add button next to Posts to create a new post. Make sure to add an “author” to each post too since by default all model fields are required.
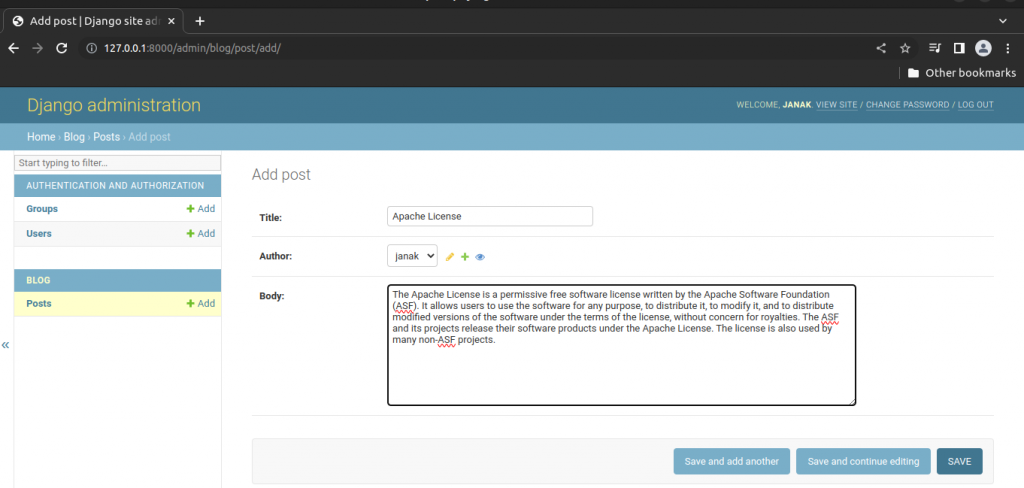
You can add multiple blog posts if you like.
Views
In blog/views.py add the following code to display the contents of our Post model using ListView.
#blog/views.py
from django.views.generic import ListView
from .models import Post

# Create your views here.
class BlogListView(ListView):
    model = Post
    template_name = "home.html"
We imported ListView and our database model Post. Then we created a class named BlogListView which is a subclass of ListView and added links to our model and template.
URLs
Create a new file named urls.py in our blog app and edit it as below.
#blog/urls.py
from django.urls import path
from .views import BlogListView

urlpatterns = [
    path("",BlogListView.as_view(),name="home"),
]
Here we imported BlogListView. The empty string, ” “, tells Python to match all values and we make it a named URL, home, which we can refer to in our views later on .
Update django_blog_app/urls.py file so that it knows to forward all requests directly to the blog app.
#django_blog_app/urls.py
from django.contrib import admin
from django.urls import path, include

urlpatterns = [
    path('admin/', admin.site.urls),
    path("",include("blog.urls")),
]
We have added include on the second line and a URL pattern using an empty string regular expression, ” “, indicating that URL requests should be redirected as is to blog‘s URLs for further instructions.
Templates
Create a new templates directory and create base.html and home.html files within that directory.
Update django_blog_app/settings.py so that Django knows to look there for our templates.
TEMPLATES = [
    {
        'BACKEND': 'django.template.backends.django.DjangoTemplates',
        'DIRS': [],
        'APP_DIRS': True,
        'OPTIONS': {
            'context_processors': [
                'django.template.context_processors.debug',
                'django.template.context_processors.request',
                'django.contrib.auth.context_processors.auth',
                'django.contrib.messages.context_processors.messages',
            ],
        },
        "DIRS": [BASE_DIR / "templates"],#new
    },
]
Update templates/base.html as follows.
<!DOCTYPE html>
<html>
    <head>
        <title>
            Django Blog
        </title>
    </head>
    <body>
        <header>
            <h1><a href="{% url 'home' %}">Django Blog</a></h1>
        </header>
        <div>
            {% block content %}
            {% endblock content %}
        </div>
    </body>
</html>
Add following lines to templates/home.html
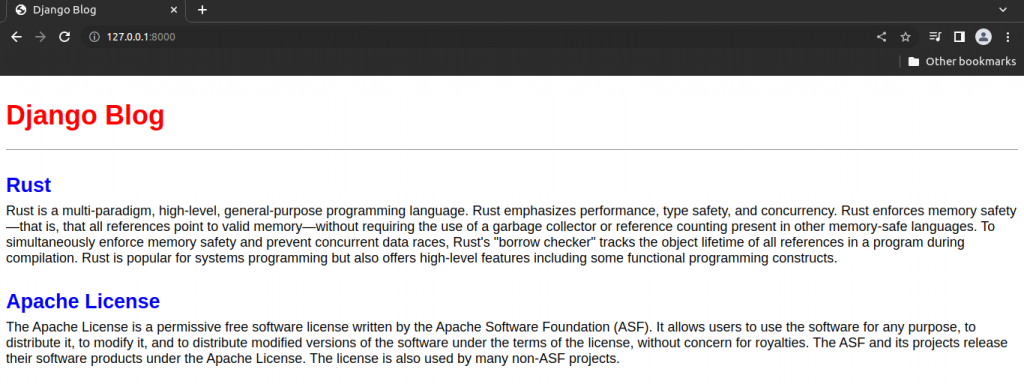
{% extends "base.html" %}

{% block content %}
    {% for post in post_list %}
        <div class="post-entry">
            <h2><a href="">{{ post.title }}</a></h2>
            <p>{{ post.body }}</p>

        </div>


    {% endfor %}
{% endblock content %}a
Run the server.
Static Files
As CSS, JavaScript or Image files are code piece of modern web application. Within Django we refer them as “static file”.
Create a folder named static.
Within that static directory create another directory named css and within that directory create a file named base.css.
Add following line of codes in static/css/base.css.
/* static/css/base.css */
body {
    font-family: 'Source Sans Pro', sans-serif;
    font-size: 18px;
    }
    header {
    border-bottom: 1px solid #999;
    margin-bottom: 2rem;
    display: flex;
    }
    header h1 a {
    color: red;
    text-decoration: none;
    }
    .nav-left {
    margin-right: auto;
    }
    .nav-right {
    display: flex;
    padding-top: 2rem;
    }
    .post-entry {
    margin-bottom: 2rem;
    }
    .post-entry h2 {
    margin: 0.5rem 0;
    }
    .post-entry h2 a,
    .post-entry h2 a:visited {
    color: blue;
    text-decoration: none;
    }
    .post-entry p {margin: 0;
    font-weight: 400;
    }
    .post-entry h2 a:hover {
    color: red;
    }
We need to tell our project where to look for static files.
Add following line to django_blog_app/settings.py as follow.
STATICFILES_DIRS = [BASE_DIR / "static"] To add css styling, we need to edit our templates/base.html file as follow.
<!DOCTYPE html>
{% load static %}
<html>
    <head>
        <title>
            Django Blog
        </title>
        <link rel="stylesheet" href="{% static 'css/base.css' %}">
        .......................................
Run the server again.
Individual Blog Pages
To view detail of each blog post in different page we start by editing our blog/views.py. We will import DetailView. Then we will create a subclass of DetailView named BlogDetailView.
#blog/views.py
#new
from django.views.generic import ListView, DetailView
from .models import Post

# Create your views here.
class BlogListView(ListView):
    model = Post
    template_name = "home.html"

#new
class BlogDetailView(DetailView):
    model = Post
    template_name = "post_detail.html"
In BlogDetailView we define the model Post and the template we want our model to be associated with i.e. post_detail.html.
By default, DetailView will provide a context object we can use in our template called either object or the lowercased name of our model i.e. post.
Create a new file post_detail.html within the folder templates and fill it with following code.
{% extends "base.html" %}
{% block content %}
<div class="post-entry">
    <h2>{{ post.title }}</h2>
    <p>{{ post.body }}</p>
</div>

{% endblock content %}
At the top we specify that this template inherits from base.html. Then display the title and body from our context object, which DetailView makes accessible as post.
Edit blog/urls.py to add a new URL path for our view.
from django.urls import path
from .views import BlogListView, BlogDetailView #new

urlpatterns = [
    #new
    path("post/<int:pk>/",BlogDetailView.as_view(),
         name="post_detail"),
    path("",BlogListView.as_view(),name="home"),

]
All blog post entries will start with post/. Next is the primary key for our post entry which will be represented as an integer, <int:pk>. Django automatically adds an auto-incrementing primary key to our database models.
Now we need to update the link on the homepage so we can directly access individual blog posts from there.
Edit templates/home.html as follow.
{% extends "base.html" %}

{% block content %}
    {% for post in post_list %}
        <div class="post-entry">
            <h2><a href="{% url 'post_detail' post.pk %}">{{ post.title }}</a></h2>
            <p>{{ post.body }}</p>

        </div>


    {% endfor %}
{% endblock content %}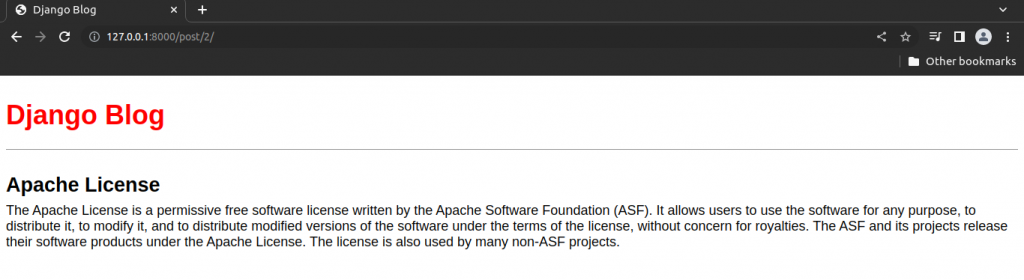
Tests
First we add tests to test our Post Model’s content.
Edit blog/test.py as follows:
from django.contrib.auth import get_user_model
from django.test import TestCase

from .models import Post

# Create your tests here.
class BlogTests(TestCase):
    @classmethod
    def setUpTestData(cls):
        cls.user = get_user_model().objects.create_user(
            username="testuser",
            email="test@email.com",
            password="secret"
        )

        cls.post = Post.objects.create(
            title = "Title",
            body = "Content",
            author = cls.user,
        )

    def test_post_model(self):
        self.assertEqual(self.post.title,"Title")
        self.assertEqual(self.post.body,"Content")
        self.assertEqual(self.post.author.username,"testuser")
        self.assertEqual(str(self.post),"Title")
        self.assertEqual(self.post.get_absolute_url(),"/post/1/")
At the top we imported get_user_model to refer to our User and then added TestCase and the Post model. Our class BlogTests contains set up data for both a test user and a test post. At the moment, all the tests are focused on the Post model so we name our test test_post_model. It checks that all three model fields return the expected values. There are also new tests for the __str__ and get_absolute_url methods in our model.
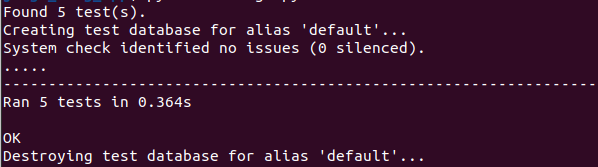
Result after running the tests.
#terminal
python3 manage.py test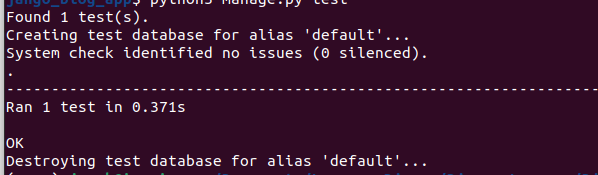
For home page and detail page we need to test the following.
- excepted URLs exist and return a 200 status code
- URL names work and return a 200 status code
- correct template name is used
- correct template content is outputted
After adding these test our blog/tests.py will look as follow:
from django.contrib.auth import get_user_model
from django.test import TestCase
from django.urls import reverse #new

from .models import Post

# Create your tests here.
class BlogTests(TestCase):
    @classmethod
    def setUpTestData(cls):
        cls.user = get_user_model().objects.create_user(
            username="testuser",
            email="test@email.com",
            password="secret"
        )

        cls.post = Post.objects.create(
            title = "Title",
            body = "Content",
            author = cls.user,
        )

    def test_post_model(self):
        self.assertEqual(self.post.title,"Title")
        self.assertEqual(self.post.body,"Content")
        self.assertEqual(self.post.author.username,"testuser")
        self.assertEqual(str(self.post),"Title")
        self.assertEqual(self.post.get_absolute_url(),"/post/1/")

    #All four methods are new
    def test_url_exists_at_correct_location_listview(self):
        response = self.client.get("/")
        self.assertEqual(response.status_code,200)

    def test_url_exists_at_correct_location_detailview(self):
        response = self.client.get("/post/1/")
        self.assertEqual(response.status_code,200)

    def test_post_listview(self):
        response =self.client.get(reverse("home"))
        self.assertEqual(response.status_code,200)
        self.assertContains(response,"Content")
        self.assertTemplateUsed(response,"home.html")

    def test_post_detailview(self):
        response = self.client.get(reverse("post_detail",
                                           kwargs={"pk":self.post.pk}))
        no_response = self.client.get("/post/100000/")
        self.assertEqual(response.status_code,200)
        self.assertEqual(no_response.status_code,404)
        self.assertContains(response,"Title")
        self.assertTemplateUsed(response,"post_detail.html")
First we check that URL exists at the proper location for both views. Then we import reverse at the top and create test_post_listview to confirm that the named URL is used, returns a 200 status code, contains the expected content and uses the home.html template.
For test_post_detailview we have to pass in the pk of the our test post to the response. The same template is used but we add new tests for what we don’t want to see. For example, we don’t want a response at the URL /post/100000 because we have not created that many posts yet! and we don’t want a 404 HTTP status response either. It is always good to sprinkle in examples of incorrect tests that should fail to make sure your tests aren’t all blindly passing for some reason.
Run the test in terminal.
python3 manage.py test