DOM JavaScript
With the HTML DOM, JavaScript can access and change all the elements of an HTML document.
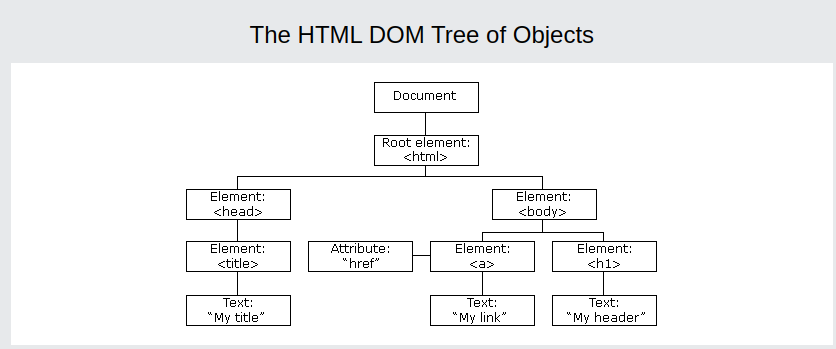
When a web page is loaded, the browser creates a Document Object Model of the page.
The HTML DOM model is constructed as a tree of Objects:
With the object model, JavaScript gets all the power it needs to create dynamic HTML.
Table of contents
- Access elements by ‘id’
- Access element by ‘tagname’
- Access element by classname
- Element click handler
- This and the DOM
- Manipulating element style
- Making a rainbow
- Adding class to elements
- Removing class from elements
- Toggling class
- Manipulating attributes
- Generating HTML table with JavaScript
- Event listeners on elements
- Creating new elements
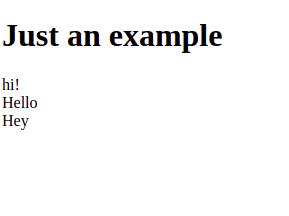
Access element by ‘id’
<!DOCTYPE html>
<html>
    <body>
        <h1>Just an example</h1>
        <div id="one" class="example">hi!</div>
        <div id="two" class="example">Hello</div>
        <div id="three" class="something">Hey</div>
    </body>
</html>
This generates a html pages that looks like
Going to console and accessing elements
document.getElementById("two")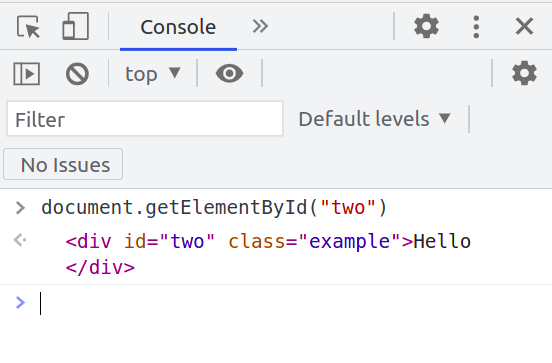
Accessing element by tag name
document.getElementsByTagName('div')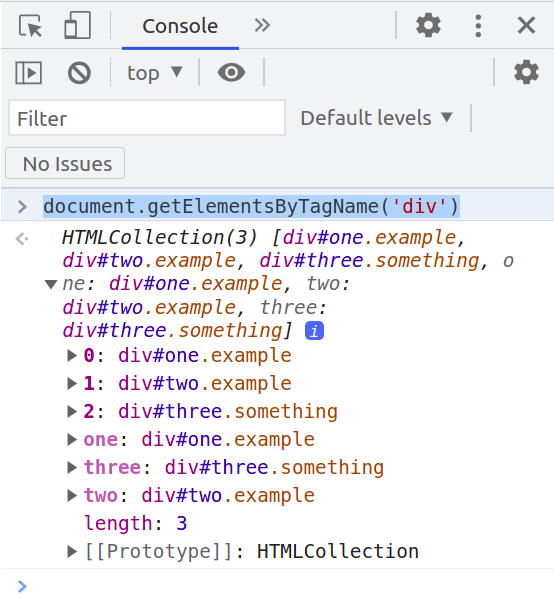
Accessing element by class name
document.getElementsByClassName('example');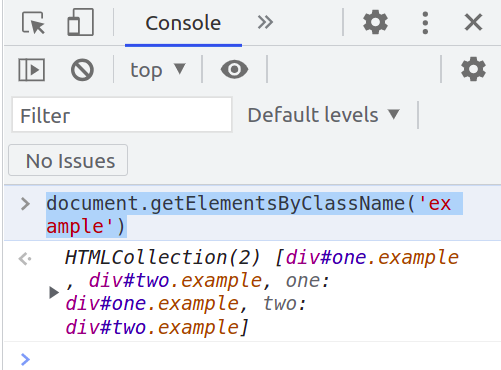
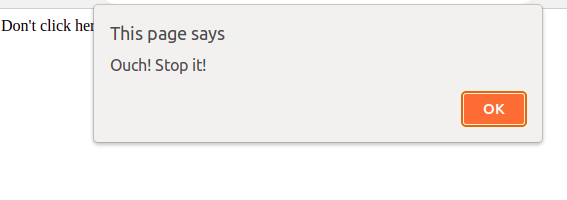
Element click handler
HTML elements can do something when they are clicked. This is because a JavaScript function can be connected to an HTML element.
<!DOCTYPE html>
<html>
    <body>
        <script>
            function stop(){
                alert("Ouch! Stop it!");
            }
        </script>
        <div id="one" onclick="stop()">
        Don't click here!
        </div>
    </body>

</html>
Output
This and the DOM
The this keyword always has a relative meaning; it depends on the exact context it is in. In the DOM, the special this keyword refers to the element of the DOM it belongs to. If we specify an onclick to send this in as an argument, it will send in the element the onclick is in.
<!DOCTYPE html>
<html>
    <body>
        <script>
            function reveal(el){
                console.log(el);
            }
        </script>
        <button onclick="reveal(this)">Click here</button>
    </body>
</html>
Output

Another Example
<!DOCTYPE html>
<html>
    <body>
        <script>
            function reveal(el){

                console.log("You pressed ",el.innerHTML);
            }
        </script>
        <button onclick="reveal(this)">Button 1</button>
        <button onclick="reveal(this)">Button 2</button>
    </body>
</html>
Output

Manipulating element style
After selecting the right element from the DOM, we can change the CSS style that applies to it. We can do this using the style property. This is how to do it:
- Select the right element from the DOM
- Change the right property of the style property of this element.
We are going to make a button that will toggle the appearing and disappearing of a line of text. To hide something using CSS, we can set the display property of the element to none, like this for a p (paragraph) element:
p {
 display: none;
}
And we can toggle it back to visible using:
p {
 display: block;
}
We can add this style using JavaScript as well. Here is a little HTML and JavaScript snippet that will toggle the displaying of a piece of text:
<!DOCTYPE html>
<html>
    <body>
        <script>
            function toggleDisplay(){
                let p = document.getElementById("magic");
                if(p.style.display ==="none"){
                    p.style.display = "block";
                }
                else {
                    p.style.display = "none";
                }
            }
        </script>
        <p id = "magic">
            I might disappear and reappear.
        </p>
        <button onclick="toggleDisplay()">magic!</button>
    </body>
</html>
As you can see, in the if statement we are checking for whether it is currently hiding, if it is hiding, we show it. Otherwise, we hide it. If you click the button and it is currently visible, it will disappear. If you click the button when the text is gone, it will appear.
Making a rainbow
<!DOCTYPE html>
<html>
    <body>
        <script>
            function rainbowify(){
                let divs = document.getElementsByTagName("div");
                for(let i=0; i<divs.length; i++){
                    divs[i].style.backgroundColor = divs[i].id;
                }
            }
        </script>
        <style>
            div {
                height: 30px;
                width: 200px;
                background-color: white;
            }
        </style>
        <div id="red"></div>
        <div id="orange"></div>
        <div id="yellow"></div>
        <div id="green"></div>
        <div id="blue"></div>
        <div id="indigo"></div>
        <div id="violet"></div>
        <button onclick="rainbowify()">Make me a rainbow</button>
    </body>
</html>
This is what you see when you first open the page:
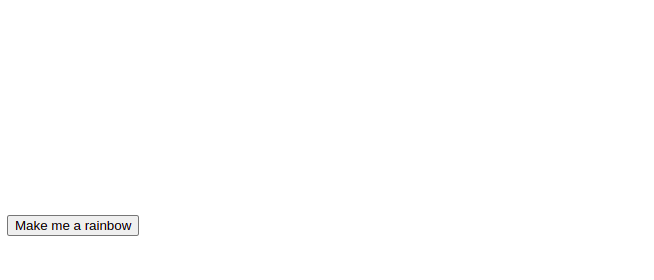
And when you click the button:
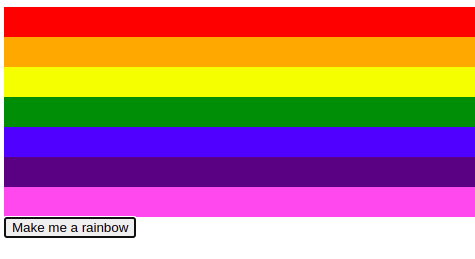
Let’s go over this script to see how works. First of all, there are a few div tags in the HTML that all have the ID of a certain color. There is a style tag specified in HTML, which gives a default layout to these div tags of 30px by 200px and a white background.
When you click the button, the rainbowify() JavaScript function is executed. In this
function the following things are happening:
- All the div elements get selected and stored in an array, divs.
- We loop over this divs array.
- For every element in the divs array, we are setting the backgroundColor property of style to the ID of the element. Since all the IDs represent a color, we see a rainbow appear.
Adding Class to Elements
<!DOCTYPE html>
<html>
    <body>
        <script>
            function changeVisibility(){
                document.getElementById("shape").classList.toggle("hide");
            }

        </script>
        <style>
            .hide {
                display: none;

            }
            .square {
                height: 100px;
                width: 100px;
                background-color: yellow;
            }

        </style>
        <div id="shape" class="square"></div>
        <button onclick="changeVisibility()">
        Magic!
        </button>
    </body>
</html>
Output
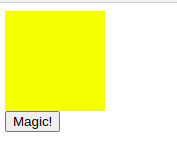
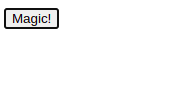
In this example, we have some CSS specified in the style tag. Elements with the hide class have a display: none style, meaning they are hidden. Elements with the square class are 100 by 100 pixels and are yellow.
When we click on the Disappear! button, the disappear() function gets called. This one is specified in the script tag. The disappear() function changes the classes by getting the classList property of the element with the ID shape, which is the square we are seeing. We are adding the hide class to the classList and because of this, the elements get the display: none layout and we can no longer see it.
Removing classes from elements
<!DOCTYPE html>
<html>
    <body>
        <script>
            function change(){
                document.getElementById("shape").classList.remove("blue");
            }
        </script>
        <style>
            .square {
                height: 100px;
                width: 100px;
                background-color: yellow;

            }

            .square.blue {
                background-color: blue;
            }

        </style>
        <div id="shape" class="square blue"></div>
        <button onclick="change()">Change!</button>
    </body>
</html>
Output
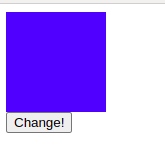
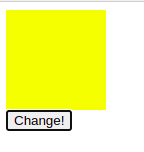
When the button gets pressed, the change function gets triggered. This function removes the blue class, which removes the blue background color from the layout, leaving us with the yellow background color and the square will turn yellow.
You may wonder why the square was blue in the first place since it had two layouts for background-color assigned to it with the CSS. This happens with a points system. When a styling is more specific, it gets more points. So, specifying two classes with no space in between means that it applies to elements with these two classes. This is more specific than pointing at one class.
Toggling Class
In some cases, you would want to add a class when it doesn’t already have that particular class, but remove it when it does. This is called toggling. There is a special method to toggle classes. Let’s change our first example to toggle the hide class so the class will appear when we press the button the second time, disappear the third time, and so on.
<!DOCTYPE html>
<html>
    <body>
        <script>
            function changeVisibility(){
                document.getElementById("shape").classList.toggle("hide");
            }

        </script>
        <style>
            .hide {
                display: none;

            }
            .square {
                height: 100px;
                width: 100px;
                background-color: blue;
            }

        </style>
        <div id="shape" class="square"></div>
        <button onclick="changeVisibility()">
        Magic!
        </button>
    </body>
</html>
Pressing the Magic! button will add the class to the classList when it isn’t there and remove it when it is there. This means that you can see the result every time you press the button. The square keeps appearing and disappearing.
Manipulating Attributes
With the setAttribute() method, we can add or change attributes on an element.
<!DOCTYPE html>
<html>
<body>
<script>
function changeAttr(){
let el = document.getElementById("shape");
el.setAttribute("style","background-color:dodgerblue;border:1px solid black");
el.setAttribute("id","new");
el.setAttribute("class","ellipse");
}
</script>
<style>
div {
height: 100px;
width: 100px;
background-color: yellow;
}
.ellipse {
height: 100px;
width: 150px;
border-radius: 50%;
}
</style>
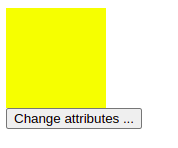
<div id="shape" class="square"></div>
<button onclick="changeAttr()">Change attributes ... </button>
</body>
</html>This is the page before clicking the button:
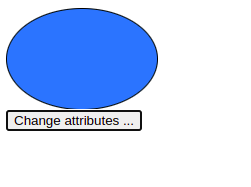
After clicking the button, the HTML of the div becomes:
<div id="new" class="ellipse" style="background-color:dodgerblue;border:1px
solid black"></div>
As you can see, the attributes are changed. The id has changed from shape to new. The class has changed from square to ellipse and a style has been added. It will look like this:
Generating HTML table with JavaScript
<!DOCTYPE html>
<html>
<body>
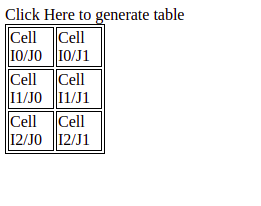
<div id="jsTable">
Click Here to generate table
</div>
</body>
<script>
window.onload = function(){
document.getElementById("jsTable").addEventListener("click",tableCreate);
}
function tableCreate(){
const body = document.body;
tbl = document.createElement('table');
tbl.style.width = '100px';
tbl.style.border = '1px solid black';
for(let i=0; i<3;i++){
const tr=tbl.insertRow();
for (let j=0;j<2;j++){
const td=tr.insertCell();
td.appendChild(document.createTextNode(`Cell I${i}/J${j}`));
td.style.border = '1px solid black';
}
}
body.appendChild(tbl);
}
</script>
</html>This code creates a HTML table when we click on the text “Click Here to generate table”.
The function tableCreate, creates the table element with the function ‘document.createElement(‘table’);’ then sets its width and style. Rows are inserted with the function ‘insertRow’, cells are inserted in each row with ‘insertCell()’ and text is written in the cells of table with function ‘createTextNode’.
Output
Event Listeners on elements
<!DOCTYPE html>
<html>
    <body>
        <script>
            window.onload = function(){
                document.getElementById("square").addEventListener("click",changeColor);
            }
            function changeColor(){
                let red = Math.floor(Math.random()*256);
                let green = Math.floor(Math.random()*256);
                let blue = Math.floor(Math.random()*256);
                this.style.backgroundColor = `rgb(${red},${green},${blue})`;

            }
        </script>
        <div id="square" style="width:500px;height: 500px;background-color: grey;">
        Click for magic
        </div>
    </body>
</html>
The web page starts with a gray square with the text Click for magic in it. After the web page is done loading, an event gets added for this square. Whenever it gets clicked, the changeColor function will be executed. This function uses random variables to change the color using RGB colors. Whenever you click the square, the color gets updated with random values.
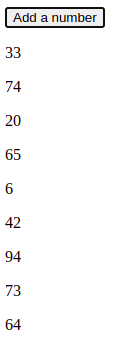
Creating new elements
This consists of two steps, first creating new elements and second adding them to the DOM.
The following JavaScript does just that:
let el = document.createElement("p");
el.innerText = Math.floor(Math.random() * 100);
document.body.appendChild(el);
It creates an element of type p (paragraph). This is a createElement() function that is on the document object. Upon creation, you need to specify what type of HTML element you would want to create, which in this case is a p, so something like this:
<p>innertext here</p>And as innerText, it is adding a random number. Next, it is adding the element as a new last child of the body. You could also add it to another element; just select the element you want to add it to and use the appendChild() method.
Here, you can see it incorporated in a HTML page. This page has a button, and whenever it gets pressed, the p gets added.
<!DOCTYPE html>
<html>
    <body>
        <script>
            function addRandomNumber(){
                let el = document.createElement("p");
                el.innerText = Math.floor(Math.random()*100);
                document.body.appendChild(el);
            }
        </script>
        <button onclick="addRandomNumber()">
        Add a number
        </button>
    </body>
</html>
Output